
Basic Sourdough Recipe with Pictures

I have produced this step by step guide based on the Master Recipe from Sourdough with Foodbod which I have found is the easiest to follow. Elaine from Foodbod has lots of online tips and YouTube clips to help you on your way. Click here to visit Foodbod Sourdough
I hope the following will be helpful for getting you started on your sourdough journey. Please email me or message me via Facebook Messenger if you have questions or you find problems with this recipe.
This recipe makes approx 900g dough - this is suitable for:
- Round Banneton - 22 - 25 cm diameter
- Oval Banneton - 25 - 30 cm length
Just double or half the recipe to suit the loaf you would like to produce
How is Sourdough Different?
Some of the things about sourdough that are different to other bread baking or baking in general:
- Sourdough is sticky stuff - adding flour to help manage your dough is a no-no. Use water on your hands to help handle sticky dough.
- Sourdough uses a greater percentage of moisture to flour ratio, hence the stickiness.
- Rice Flour is your new best friend - it acts like a non-stick agent.
- Your kitchen will get messy. Deal with it. That's what baking is all about!
- Sourdough is a much slower process than any other baking. Allow around 24 hours before you will be sinking your teeth into a slice of bread. But note, you will not be working flat out for 24 hours. Sourdough is more about - do a little bit of work, go away for a while, come back and do a bit more....
- Enjoy the journey. Slow down and enjoy what your starter produces.
- Sourdough is a simple affair - Water, Flour & Salt. Anything else you add is up to you. No preservatives and your starter is the product of flour, water and natural yeast.
- Your starter becomes like a pet you tend to at least once a week and otherwise keep in the fridge.
- You need to use Baker's Flour or Bread Flour - higher in protein than regular plain flour.
The next five steps with photos attached are designed for a sourdough beginner. At the bottom of this page is a summary of the recipe and a timeline I follow - you can formulate your own to suit your day or weekend. This recipe summary is for use with a banneton and bread baking cloche, oval enamel roaster or Dutch oven. There is a PDF version of this recipe below if you would like to print it out.
PDF of Recipe & Timeline for Round or Oval Loaf
PDF of Recipe & Timeline for Large Family Loaf
Timeline for Basic Sourdough Recipe - 24 hours usually
- 3-4 hours Sourdough Starter Feed & Activation (this is assuming you are using Starter that has been prepared for baking - not dehydrated starter)
- 1 hour Autolyse Dough
- 2.5 hours Stretch and Folds
- 6 hours Proof in Bowl
- 8 hours (or more) Ferment in Fridge - overnight is perfect
- 1hr 20 minutes Baking
I will typically start my loaf in the morning and be able to bake the following morning. Make this timeline work for you. Use your fridge to slow things down if need be until you are ready for the next step.
For a 'work away from home' timetable try this:
- Feed your starter just before you go to work. Leave it somewhere cool (around 18c).
- When you get home from work mix your dough. One hour autolyse and stretches & folds over the next two hours.
- Leave dough overnight on the kitchen bench in covered bowl.
- In the morning shape dough and put in a banneton.
- Leave in the fridge during the day.
- Bake after 8 hours, ready for dinner that night.
Ingredients:
- Sourdough Starter at least 60g - not Dehydrated - must have been rehydrated already
- 30g Room Temperature Water
- 30g Bread / Baker's Flour
- 350g Room Temperature Water
- 500g Bread / Baker's White Flour
- 1 teaspoons Salt
- Rice Flour
Equipment:
- Mixing Bowl with cover or Gladwrap to cover
- Dough Whisk or Spoon
- Kitchen Scales
- Spatula or Dough Scraper
- Banneton
- Baking Cloche, Enamel Roaster or Dutch Oven
1. Basic Sourdough Recipe
You will need
- Sourdough Starter
- 30g Water
- 30g of Baker's Flour
- Rubber band
Note
Water needs to be de-chlorinated (tap water can be de-chlorinated by boiling then cooling) or bottled water
Flour must be strong / high protein flour, sold as Bread or Baker's Flour.
Dehydrated Sourdough Starter is available here.
Process
Add water to starter & mix well with a whisk to break up the starter, here I have used my Small Danish Dough Whisk. Use a set of scales to measure your water (30ml = 30g).
Add flour and whisk until smooth.
Please note the following photos are for a large family loaf which is double this recipe and using a Bread Baking Cloche available here.

Use a spatula to wipe down the sides of the jar. Cover your starter and leave it out on the kitchen bench to become active. I use a rubber band around my jar to mark the level of the starter prior to leaving it.
The starter should be left to become bubbly and to double in height in the jar. The time for this varies depending on many things, including the temperature in your kitchen (no need to add warmth). Leave for approximately 2-4 hours.

You will need
50g Active Starter
350g Room Temperature Water
500g White Unbleached Baker's/ Bread Flour
1 teaspoons of salt
Rice Flour
Mixing Bowl - approx 4 litre capacity
Wooden Spoon or Danish Dough Whisk
Process
Use scales to accurately measure your ingredients.
Take 50g of your active starter and place in a large mixing bowl. Here I use a 4 litre glass bowl with a clip-on lid, perfect for mixing, keeping an eye on the sides of the dough and for covering the dough during proving.
Put the rest of the starter in the fridge, covered and ready for your next bake. Each time you want to bake you will go back to step 1 and feed it.

Add the water and use a whisk to break up the starter. Add the flour and salt and use a wooden spoon to loosely mix the dough. At this point the dough does not need to be smooth. The flour just needs to be wet and incorporated until the dough is ragged in appearance - see below.

Cover your bowl and leave the dough to Autolyse* for one hour. Your bowl can just sit out on the kitchen bench, there is no need for any warmth to be added.

*Autolyse - a short rest after combining flour and water affects dough development in the following positive ways:
- The flour fully hydrates. This is particularly useful when working with whole-grain flour because the bran softens as it hydrates, reducing its negative effect on gluten development.
- Gluten bonds begin developing with no effort on the part of the baker, and kneading time is consequently reduced.
- Carotenoid pigments remain intact, leading to better color, aroma, and flavor.
- Fermentation proceeds at a slower pace, allowing for full flavor development and better keeping quality.
- The dough becomes more extensible (stretchy), which allows it to expand easily. This leads to easier shaping, greater loaf volume, a more open crumb structure, and cuts that open more fully.
Autolyse description by Barb Alpern, King Arthur Flour Website
This recipe does not require any kneading as such. The dough is worked by a method known as "Stretches and Folds", where the dough is kept in the bowl and is picked up by hand, stretched upwards as far as it will go and then let drop or fold back on itself. The bowl is then turned a quarter turn, and the stretch and fold is repeated. Keep in mind that the dough at this point is quite sticky - DO NOT BE TEMPTED TO FLOUR YOUR HANDS! Embrace the stickiness - this is a good thing! Wetting your hands will stop the dough sticking so much - use water not flour.
First Stretch & Fold
Wet your hand with water to stop the dough sticking so much. For the first set of stretches and folds, repeat these steps around 15 - 18 times until the dough is smooth and elastic. As below. After these stretches and folds, cover your bowl (with a lid or GladWrap) and leave on the bench for 30 minutes.


Next Stretches & Folds - Over 2 Hours
Repeat Stretch and Fold of dough only 4 times now as your dough should be well mixed from the first 18 stretches and folds. Turning the bowl a quarter turn each time. Cover bowl and let sit for 30 minutes.
Repeat this another 3 times over the course of the next 2 hours.
Now cover the dough and let sit on the kitchen bench for 6 hours. This is your main rising period.

Now that your dough has been sitting for 6 hours rising, it is time to shape your dough to prepare for your final loaf shape.
Prepare your Banneton
Here traditionally a rattan banneton is used to shape your loaf. Bannetons create the shape and pattern the outside of the loaf with lines. A banneton is not essential, a lint free piece of cloth such as a tea towel floured liberally with rice flour and used to line a loaf tin, colander or bowl works as well.
Some of the bannetons available on this site include:

To prepare your banneton for its first use, put it under a running tap to very briefly wet the inside. Shake off excess water and sprinkle liberally with rice flour to stop the dough sticking. Don't be concerned with the amount of rice flour you use - it is inexpensive and will dust off your finished loaf. For subsequent uses, there is no need to wet your banneton again, just sprinkle liberally again with rice flour. After each use, I allow the banneton to dry out completely, shake out excess rice flour and store it in an airtight container or plastic bag.
Getting Your Dough into a Banneton
After the 6 hours on the kitchen bench your dough will be smooth and may have some bubbles appearing on the surface like this:

Wet your hand before lifting the edges of your dough and folding them into the middle. Be gentle with your dough here to preserve all those beautiful pockets of air.


Use a dough scraper to help with this process if needed. Once your dough is shaped into a cohesive ball like this:

Lift the dough out of the bowl and shape it gently with your hands to the shape of your banneton. Gently place the dough into the banneton, keep in mind that your loaf is upside down in the banneton - that is the top of the loaf is on the bottom of the banneton.

Gently pat your dough down into the banneton.

Shake rice flour around the edges & top of the dough. Cover your dough with a shower cap (the disposable ones you find in hotel rooms or can purchase at chemists) or cling wrap ready to go in the fridge.


Place the dough in the fridge for 8 hours. If this time frame does not suit, it can stay there for up to 24 hours. The dough will enhance in 'sourness' the longer it is left in the fridge. The dough may rise a small amount in the fridge, but this is not to be expected. The 6 hours on the bench was the proving time, the time in the fridge will enhance the flavour.
What Do I Bake My Bread In?
To get a good crusty loaf and good oven 'spring' or rise, you will need to replicate a professional baker's oven, where steam makes for a great crust.
To do this in the home oven you can use two different methods.
1. Covered Bake - Using a cloche, dutch oven, casserole dish turned upside down or some other oven-proof cover over your dough leaving enough room for some expansion.
Here are some of the containers I have used to bake the covered way that are available here.


2. Added Steam - Placing an oven proof dish filled with boiling water in your oven while you bake will do the same thing. With this method you can use a traditional loaf tin, baking tray or whatever you wish to put your dough on or in.

Do I Preheat the Oven?
One of the joys of baking sourdough is that you do not need to preheat your oven when baking in a cloche or dutch oven. An extra 10-15 minutes in the oven is all that is needed instead! I recommend preheating your oven if you are baking uncovered with steam added in the form of a dish of boiling water.
Getting Your Dough Ready
After time in the fridge, the dough should be firmer and easier to handle. Decide on what you are going to use to bake. I recommend using baking paper as not only an easy way to lift your dough into its baking container but also to line your baking tin or cloche to prevent dough from sticking.
Turn your dough out of the banneton onto a sheet of baking paper like so:

Gently lift the baking paper and dough onto a baking tray or into a baking cloche as shown:

Straighten out the baking paper neatly around the dough especially in the corners. Leave the baking paper above the edges of the dough to stop the lid sticking to the dough as it rises in the oven.
Scoring or Slashing the Dough
The purpose of the traditional cuts in the top of sourdough is to allow the dough to expand as it rises in the oven in a controlled way. Cutting the dough is also a way of decorating the loaf as you will see if you look at Instagram or Facebook posts of sourdough! A 'Lame' is used to cut the dough and is basically a double sided blade traditionally used by bakers. A razor blade makes an excellent 'lame', but as they are very sharp, many different types of holders have been developed to make them safer to use. These are some that I have available on this website:


Use the Lame or a razor blade to slash the dough using quick cuts in whatever designs you like. At least one long score in the dough allows for escape of steam and the rise of the dough as it cooks. Make sure your cuts into the dough are an least 1 cm or more deep.


Put the lid on your baking vessel allowing the baking paper to sit inside the lid.
Time to Bake!
Place the cloche in the oven and set to 220c for 50 minutes. During this time do not be tempted to lift the lid or open the oven as this will allow the steam to escape. After 50 minutes in the oven lift the lid off the baker to check on how brown the loaf is. Be very careful with the lid if it is ceramic like this one - it is very hot and will crack if you place it on a cold surface - best put on a tea towel, trivet or wooden chopping board.

I usually find that the loaf needs an extra 15 - 20 minutes in the oven uncovered to brown the crust. Pull the baking paper away from the sides of the loaf to allow the crust to brown all over.

Return the loaf to the oven, keep the temperature at 220c for 15 - 20 minutes or until the loaf is well browned and at this point a digital thermometer is a great idea to give you some idea of the internal temperature of the loaf.
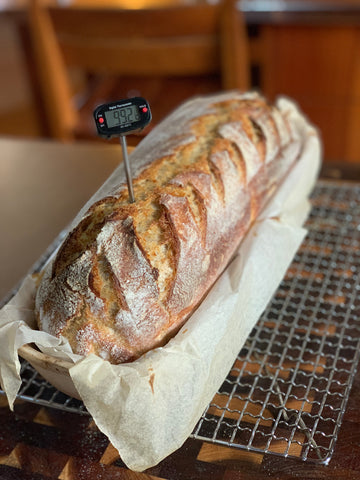
The internal temperature of the loaf should be 97c, the loaf should be well browned and the underside of the loaf should sound hollow when tapped.
Turn your loaf out onto a wire rack to cool. The biggest challenge now is to leave the loaf to cool completely!! Warm sourdough will cut with a 'doughy' texture. Be patient - it WILL be worth it, trust me. Some bakers leave their loaves for 12-24 hours before cutting .... I'm not that patient!

SUMMARY OF THE ABOVE
PDF of Recipe & Timeline for Round or Oval Loaf
PDF of Recipe & Timeline for Large Family Loaf
Timeline for Basic Sourdough Recipe - 24 hours usually
- 3-4 hours Sourdough Starter Feed & Activation
- 1 hour Autolyse Dough
- 2.5 hours Stretch and Folds
- 6 hours Proof in Bowl
- 8 hours (or more) Ferment in Fridge - overnight is perfect
- 1hr 20 minutes Baking
I will typically start my loaf in the morning and be able to bake the following morning. Make this timeline work for you. Use your fridge to slow things down if need be until you are ready for the next step.
For a work day timetable try this:
- Feed your starter just before you go to work. Leave it somewhere cool (around 18c).
- When you get home from work mix your dough. One hour autolyse and stretches & folds over the next two hours.
- Leave dough overnight on the kitchen bench in covered bowl.
- In the morning shape dough and put in a banneton.
- Leave in the fridge during the day.
- Bake after 8 hours, ready for dinner that night.
Ingredients:
To produce 50g of Active Starter:- Sourdough Starter
- 30g Cold Water
- 30g Bread / Baker's Flour
- 50g Active / Bubbly Sourdough Starter as above
- 350g Cold Water
- 500g Bread / Baker's White Flour
- 1 teaspoons Salt
- Rice Flour
Equipment:
- Mixing Bowl with cover or Gladwrap to cover
- Whisk or Spoon
- Kitchen Scales
- Spatula or Dough Scraper
- Banneton
- Baking Cloche or Dutch Oven
Process:
- Remove starter from the fridge. Mix in 30g each of water and flour. Cover and allow to sit on kitchen bench for 2 - 4 hours until doubled in height and bubbly. Remove 50g active starter for the dough and then return the rest of the starter to the fridge for your next bake.
- In a large mixing bowl mix 50g active starter, water, flour and salt into a loose, ragged dough.
- Allow to sit in covered bowl on kitchen bench for 1 hour this is known as the 'autolyse'
- Mix dough using stretch and fold technique in the bowl 15 -18 times until the dough is well mixed and fairly smooth. It will still be sticky.
- Leave dough in covered bowl for 30 minutes.
- Do a set of 4 stretch and folds, turning the bowl a quarter turn each time. Leave in covered bowl on kitchen bench for 30 minutes.
- Repeat this step 3 more times over the next 2 hours.
- Leave dough in covered bowl for 6 hours on your kitchen bench.
- Shape dough and place in banneton well coated with rice flour. Sprinkle rice flour around sides and top of dough.
- Cover banneton with cling wrap or GladWrap. Place in fridge for 8 hours.
- Turn dough out onto baking paper and carefully transfer to cloche or Dutch oven.
- Score dough with lame.
- Place lid on cloche or Dutch oven. Place cloche into cold oven set to 220c. Leave to bake for 50 minutes without lifting lid.
- After 50 minutes, remove lid and check loaf. Return loaf to the oven without cover for further 15 - 20 minutes to brown crust.
- Loaf will be cooked when crust is well browned and bottom of loaf sounds hollow when tapped. A good way to test is with a digital cooking thermometer - this will show the internal temperature of loaf has reached 97c when it is cooked.
- Allow loaf to cool for at least 1 hour before slicing. Longer is better. Be Patient!